Web Processing Services (WPS) Tube Select
Warning
This tutorial uses data from the old Twitter, but has not been updated for the current X API. If you are interested in updating the tutorial, please reach out to the GeoMesa community.
This tutorial will show you how to:
Ingest a set of Twitter data.
Use GeoServer Web Processing Services (WPS) to generate time-interpolated queries.
Query from and save results to GeoServer layers.
Introduction
A time-interpolated query finds features that intersect in both space and time. Normal spatial or temporal queries select features that fall within a specified geometry, time range, or both. A time-interpolated query has a changing geometry as you move forward in time.
Imagine you are traveling from Washington, DC to New York City and are interested in people traveling the same route at the same time. These travelers would be within a given distance from you at any point in the trip. They wouldn’t be in DC while you were arriving in New York. Thus the geometry of results of your query would be a function of time.
Time-interpolated queries are more complex than normal spatial or temporal queries, as the input is a sequence of points or lines with an increasing time attribute. Time-interpolated queries are colloquially known as tube selects.
Prerequisites
Make sure that you’ve worked through the steps described in the Installation section of the GeoMesa User Manual, particularly the tasks relevant to Accumulo. Afterwards, it may be necessary to change the versions of Accumulo and Hadoop that the tutorial uses. After completing the deployment tutorial, you should have:
an instance of Accumulo 2.0.1 or 2.1,
access to an Accumulo user that has both create-table and write permissions, and
an instance of GeoServer 2.5.2 with the GeoMesa plugin installed.
Because this tutorial requires building custom Java code, development tools should also be installed and configured:
Java JDK 11 or 17
Apache Maven 3.6.3 or later, and
a git client
Using the GeoServer Plugin
Once everything is installed you should see “geomesa:TubeSelect” appear in the WPS Request Builder, which is found under the Demos link in the menu bar on the left side of the GeoServer web administration interface.

“geomesa:TubeSelect WPS plugin”
Downloading and Building the Tutorial Code
Clone the geomesa project and build it, if you haven’t already:
$ git clone https://github.com/locationtech/geomesa.git
$ cd geomesa
$ mvn clean install
This is needed to install the GeoMesa JAR files in your local Maven
repository. For more information see the GeoMesa Accumulo Quick
Start tutorial. We’ll be using Twitter data
from the public Twitter API for this tutorial and ingesting it using a
single node ingester that uses a
GeoTools-based FeatureSource to
ingest into GeoMesa. First, check out the code and take a look at it:
$ git clone https://github.com/geomesa/geomesa-twitter
$ cd geomesa-twitter
To build the project, run the following command:
$ mvn clean install
Collecting Twitter Data
Warning
It will take several hours to collect a large enough set of Twitter data for the analysis below.
The twitter-collect module collects Twitter data in JSON format and writes it a local file. To run the code, you will need a Twitter account, as well as access tokens. Go to the Twitter development app management console at https://apps.twitter.com/ and create a new application, then go to the “Keys and Access Tokens” page to generate an “Access Token.” The consumer API key, the consumer secret, the access token, and the access token secret are all needed to run the collection process.
Run the program:
$ java -jar twitter-collect/target/twitter-collect-accumulo1.5-1.0-SNAPSHOT.jar \
    --consumerKey <CONSUMER_KEY> \
    --consumerSecret <CONSUMER_SECRET> \
    --outputDir ./tmp \
    --secret <ACCESS_SECRET> \
    --token <ACCESS_TOKEN>
This will collect live Twitter data and save it in JSON files in the
tmp subdirectory; this will collect data indefinitely until it is
interrupted.
Ingesting Twitter Data
The twitter-ingest module takes a set of JSON files.
There are three classes in the module:
Runner: Provides the main method to handle command line argument parsingTwitterFeatureIngester: Inserts features into GeoMesa using a GeoToolsFeatureSourceTwitterParser: Parses Twitter JSON files and turns them intoSimpleFeatures
Run the ingest program:
$ java -jar twitter-ingest/target/twitter-ingest-accumulo1.5-1.0-SNAPSHOT.jar \
    --featureName <featureName> \
    --tableName <tableName> \
    --instanceId <instance> \
    --user <user> \
    --password <password> \
    --zookeepers <zookeepers> \
    tmp/20151201/20151201-090959.txt
where <featureName> is the name of the SimpleFeatureType to create,
<tableName> is the name of the GeoMesa catalog table to use, and
<instance>, <user>, <password>, and <zookeepers>are
needed to connect to Accumulo. The final argument is the name of one of
the Twitter JSON files created by the twitter-collect module.
After ingesting the data, create a data store and layer in GeoServer from the data ingested into GeoMesa (see the VISUALIZE DATA WITH GEOSERVER section of the GeoMesa Accumulo Quick Start tutorial for more details about how to do this).
More about parsing Twitter JSON data
The JSON object returned from the tweets stream is documented on the Twitter developer site. For this tutorial we’ll be interested in the following fields:
coordinates: a geoJSON object with lat/lon (do not use the deprecatedgeofield)user: the user objectid: the user idname: the user nameid: the tweet idcreated_at: the time when the tweet was createdtext: the text of the tweet
The Twitter JSON looks something like this:
{
  "retweeted" : false,
  "source" : "web",
  "favorited" : false,
  "coordinates" : {
    "coordinates" : [
      -75.14310264,
      40.05701649
    ],
    "type" : "Point"
  },
  "place" : null,
  "retweet_count" : 0,
  "entities" : {
    "hashtags" : [],
    "user_mentions" : [
      {
        "name" : "Twitter API",
        "indices" : [
          19,
          30
        ],
        "id" : 6253282,
        "id_str" : "6253282",
        "screen_name" : "twitterapi"
      }
    ],
    "urls" : []
  },
  "truncated" : false,
  "in_reply_to_status_id_str" : null,
  "created_at" : "Wed Feb 29 19:42:02 +0000 2012",
  "contributors" : null,
  "text" : "Man I like me some @twitterapi",
  "in_reply_to_user_id" : null,
  "user" : {
    "friends_count" : 5,
    "follow_request_sent" : null,
    "profile_sidebar_fill_color" : "ffffff",
    "profile_image_url" : "https://a1.twimg.com/profile_images/1540298033/phatkicks_normal.jpg",
    "profile_background_image_url_https" : "https://si0.twimg.com/profile_background_images/365782739/doof.jpg",
    "profile_background_color" : "C0DEED",
    "notifications" : null,
    "url" : "https://blog.roomanna.com",
    "id" : 370773112,
    "is_translator" : false,
    "following" : null,
    "screen_name" : "fakekurrik",
    "lang" : "en",
    "location" : "",
    "followers_count" : 8,
    "statuses_count" : 142,
    "name" : "fakekurrik",
    "description" : "I am just a testing account, following me probably won't gain you very much",
    "favourites_count" : 1,
    "profile_background_tile" : true,
    "listed_count" : 0,
    "contributors_enabled" : false,
    "profile_link_color" : "0084B4",
    "profile_image_url_https" : "https://si0.twimg.com/profile_images/1540298033/phatkicks_normal.jpg",
    "profile_sidebar_border_color" : "C0DEED",
    "created_at" : "Fri Sep 09 16:13:20 +0000 2011",
    "utc_offset" : -28800,
    "verified" : false,
    "show_all_inline_media" : false,
    "profile_background_image_url" : "https://a3.twimg.com/profile_background_images/365782739/doof.jpg",
    "default_profile" : false,
    "protected" : false,
    "id_str" : "370773112",
    "profile_text_color" : "333333",
    "default_profile_image" : false,
    "time_zone" : "Pacific Time (US & Canada)",
    "geo_enabled" : true,
    "profile_use_background_image" : true
  },
  "id" : 174942523154894848,
  "in_reply_to_status_id" : null,
  "geo" : null,
  "in_reply_to_user_id_str" : null,
  "id_str" : "174942523154894848",
  "in_reply_to_screen_name" : null
}
We parse this object manually with GSON (google-json). Optionally, you can create Java Object bindings for GSON and parse the entire tweet into an object. For more information about connecting to the twitter public stream check out the Twitter Public Stream website.
Creating a Web Processing Service (WPS) Request
The WPS builder will provide us with a sample XML document as a starting
point to perform a tube select. Entering the values we want and clicking
the “Generate XML” button produces the request document that we’ll save
as tube-select.xml for use later.
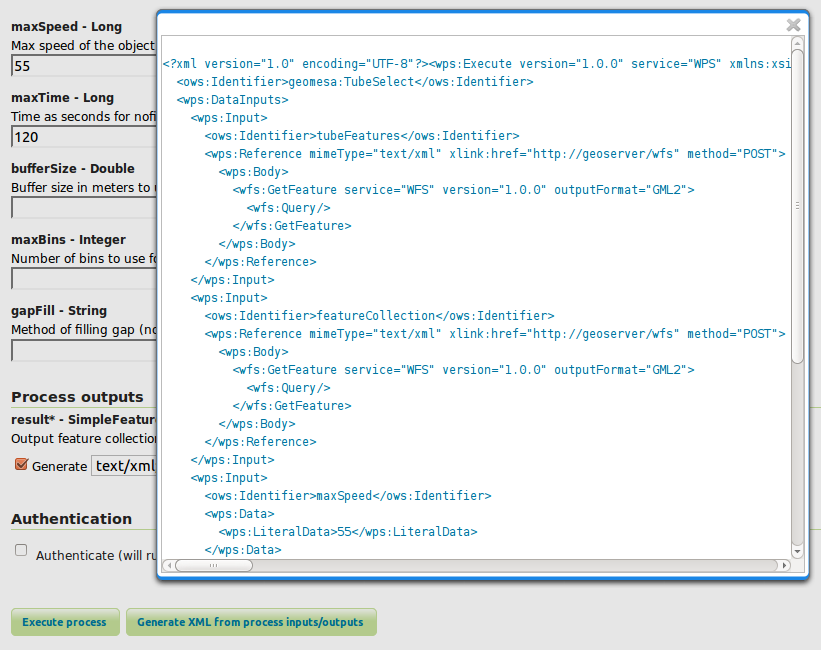
“Generating XML from inputs”
Chaining Processes
WPS supports chaining other WPS processes. This is useful when selecting data from an existing layer or storing data back into GeoServer to create a new layer. The GeoServer User Guide has a section on Process Chaining.
Tube Selections
Using a Layer as Input
For this demonstration, let’s assume someone is traveling from
Wilmington, DE to north of Philadelphia, PA along the New Jersey
Turnpike and is tweeting. Each tweet would have a GPS coordinate and a
timestamp allowing us to infer that the person was traveling somewhere
around 55mph (25 m/s) on the Turnpike. This track is the input that
defines the “tube” geometry for our query. Using the maxSpeed of 25
m/s and a maxTime of 120s we will create a space/time query tube.
Here’s a GeoServer rendering of a possible track:
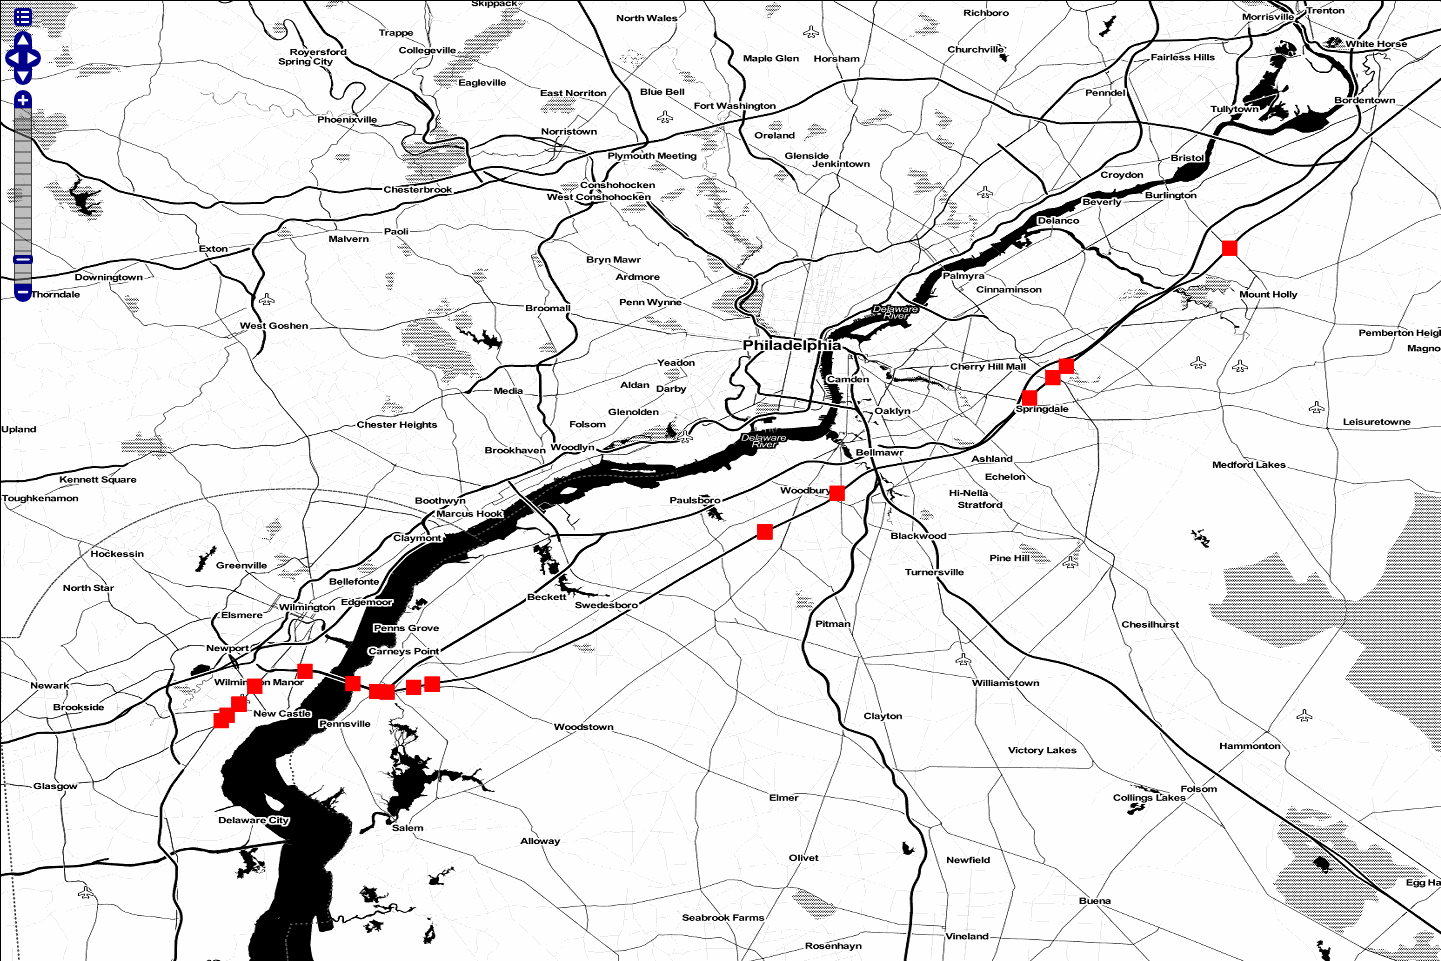
“Tube Features”
Using JSON as Input
Instead of using a layer as input, you can manually define an input
FeatureCollection track with JSON using
GeoJSON. The features need a unique id,
a geometry object, and a property named dtg representing the
observation time of the feature. A sample of two of our input track
points is shown below:
 <wps:Input>
    <ows:Identifier>tubeFeatures</ows:Identifier>
    <wps:Data>
         <wps:ComplexData mimeType="application/json">
            <![CDATA[
            {
               "features" : [
                    {
                        "id" : "0",
                        "geometry" : {
                            "coordinates": [-75.6002273 , 39.669456],
                            "type" : "Point"
                        },
                        "type" : "Feature",
                        "properties" : {
                            "dtg" : "2014-05-17T15:33:16.000+0000",
                        }
                    }, {
                        "id" : "1",
                        "geometry" : {
                            "coordinates": [-75.5102991 , 39.6857254],
                            "type" : "Point"
                        },
                        "type" : "Feature",
                        "properties" : {
                            "dtg" : "2014-05-17T15:39:28.000+0000",
                        }
                    }
               ],
               "type" : "FeatureCollection"
            }
            ]]>
        </wps:ComplexData>
    </wps:Data>
</wps:Input>
Posting a Query
After creating our tube query XML we can post it to GeoServer with
curl:
$ curl -u admin:geoserver -H 'Content-type: xml' -XPOST -d@'/tmp/query.xml' http://localhost:8080/geoserver/wps | json_pp
In this request, the MIME type of the result variable is set to json
in our file query.xml:
<wps:ResponseForm>
  <wps:RawDataOutput mimeType="application/json">
    <ows:Identifier>result</ows:Identifier>
  </wps:RawDataOutput>
</wps:ResponseForm>
We piped the output into json_pp, which will pretty print the output (native packages are available for most Linux distributions).
Saving The Output as a Layer
Chaining your result with a gs:import process allows you to store
your layer back into GeoMesa, allowing you to render a layer. Below we
have created a layer combination with a map, our original tube track,
and our results with maxSpeed 25 m/s and maxTime 120 s. These
layers are mapproxy:globe.osm.toner, accumulo:njtrack, and
accumulo:nj120:
http://localhost:8080/geoserver/wms?service=WMS&version=1.1.0&request=GetMap&layers=mapproxy:globe.osm.toner,accumulo:njtrack,accumulo:nj120&styles=&bbox=-75.62390877,39.65103897,-74.81563784,40.04023423&width=1440&height=960&srs=EPSG:4326&format=application/openlayers

“Tube Result at 25m/s 120s”
Tweaking Parameters
maxSpeed, maxTime, bufferSize
Adjusting the maxSpeed and maxTime parameters will increase the
size of the tube from both a spatial and temporal aspect. Features that
are further away in either time or geometry could possibly be reached by
the input track by increasing these parameters. Below, we have doubled
our maxTime to 240 s creating a wider tube. Perhaps our friend
strayed off the highway and visited a restaurant or gas station. We’d
like to account for that possibility. Once again, a chained
gs:import command has stored the layer as nj240.
http://localhost:8080/geoserver/wms?service=WMS&version=1.1.0&request=GetMap&layers=mapproxy:globe.osm.toner,accumulo:njtrack,accumulo:nj240&styles=&bbox=-75.62390877,39.65103897,-74.81563784,40.04023423&width=1440&height=960&srs=EPSG:4326&format=application/openlayers

“Tube Result at 25m/s 240s”
gapFill
Many input tracks can be sparse. Our friend driving the Turnpike didn’t
tweet every 5 seconds. Selecting a gapFill method fills in those
missing tracks. In this tutorial we used the line option for gap
filling. The options available for the gapFill method are:
none- use when you have a dense trackline- draws a line between points two points and uses the time range of both points
Beyond Curl
WPS services can also be accessed by a variety of clients including OpenLayers, which provides a JavaScript WPS client.