GeoMesa Authorizations
Visibilities and Authorizations
One of the most powerful features of Accumulo is the implementation of cell-level security, using visibilities and authorizations. Data that is protected by visibilities can only be seen by users that have the corresponding authorizations. This allows for the fine-grained protection of data, based on arbitrary labels.
Note
Authorizations are distinct from table-level permissions, and operate at a much finer grain.
If you are not familiar with Accumulo authorizations, you should review the relevant Accumulo documentation, with more examples here.
Public Key Infrastructure (PKI)
Public key infrastructure can be used to securely authenticate end users. In PKI, a *certificate authority* (CA) will issue digital certificates that verify that a particular public key belongs to a particular individual. Other users can then trust that certificate because it has been digitally signed by the CA.
In this tutorial, the keys used are not provided by trusted CAs. As such, it is necessary to import the CA’s certificate into the Java keystore, which allows Java (and by extension Tomcat) to trust any keys verified by the CA.
PKI solves the issue of *authentication* (who a user is) but not *authorization* (what a user can do). For this tutorial, authorization is provided by an LDAP server.
This tutorial will show you how to:
- Set visibilities on your data during ingestion through GeoMesa
- Apply authorizations to your queries through GeoMesa
- Implement user authorizations through the GeoMesa GeoServer plugin, using PKI certs to authenticate with GeoServer and LDAP to store authorizations
- Query GeoServer over WFS with a Java client using PKI certs for authentication
Prerequisites
Before you begin, you must have the following:
- an instance of Accumulo 1.7 or 1.8 running on Hadoop 2.2 or better,
- an Accumulo user that has appropriate permissions to query your data,
- Java JDK 8
- Apache Maven 3.2.2 or better, and
- a git client.
Note
Ensure that the version of Accumulo, Hadoop, etc in
the root pom.xml match your environment.
Visibilities in GeoMesa
GeoMesa supports applying a single set of visibilities to all data in a
DataStore. When configuring a DataStore, the visibilities can be
set with the visibilities parameter:
// create a map containing initialization data for the GeoMesa data store
Map<String, String> configuration = new HashMap<String, String>();
configuration.put("visibilities", "user&admin");
DataStore dataStore = DataStoreFinder.getDataStore(configuration);
Any data written by this DataStore will have the visibilities
“user&admin” applied.
Alternatively, GeoMesa also supports feature-level visibilities. This can be set through user data in a simple feature:
import org.locationtech.geomesa.security.SecurityUtils;
...
SimpleFeature sf = ...
// set user data directly
sf.getUserData().put(SecurityUtils.FEATURE_VISIBILITY, "user&admin");
// alternatively, use static utility methods
SecurityUtils.setFeatureVisibilities(sf, "user", "admin");
This tutorial uses DataStore level visibilities.
Authorizations in GeoMesa
When performing a query, GeoMesa delegates the retrieval of authorizations to *service providers* that implement the following interface:
package org.locationtech.geomesa.security;

public interface AuthorizationsProvider {

    public static final String AUTH_PROVIDER_SYS_PROPERTY = "geomesa.auth.provider.impl";

    /**
     * Gets the authorizations for the current context. This may change over time
     * (e.g. in a multi-user environment), so the result should not be cached.
     *
     * @return
     */
    List<String> getAuthorizations();

    /**
     * Configures this instance with parameters passed into the DataStoreFinder
     *
     * @param params
     */
    void configure(Map<String, Serializable> params);
}
When a GeoMesa DataStore is instantiated, it will scan for available
service providers. Third-party implementations can be enabled by placing
them on the classpath and including a special service descriptor file.
See the Oracle
Javadoc
for details on implementing a service provider.
The GeoMesa DataStore will call configure() on the
AuthorizationsProvider implementation, passing in the parameter map
from the call to DataStoreFinder.getDataStore(Map params). This
allows the AuthorizationsProvider to configure itself based on the
environment.
To ensure that the correct AuthorizationsProvider is used, GeoMesa
will throw an exception if multiple third-party service providers are
found on the classpath. In this scenario, the particular service
provider class to use can be specified by the following system property:
geomesa.core.security.AuthorizationsProvider.AUTH_PROVIDER_SYS_PROPERTY = "geomesa.auth.provider.impl";
For simple scenarios, the set of authorizations to apply to all queries
can be specified when creating the GeoMesa DataStore by using the
auths configuration parameter. This will use the
DefaultAuthorizationsProvider implementation provided by GeoMesa.
// create a map containing initialization data for the GeoMesa data store
Map<String, String> configuration = new HashMap<String, String>();
configuration.put("auths", "user,admin");
DataStore dataStore = DataStoreFinder.getDataStore(configuration);
If there are no AuthorizationsProviders found on the classpath,
and the auths parameter is not set, GeoMesa will default to using
the authorizations associated with the underlying Accumulo connection
(i.e. the user configuration value).
Warning
This is not a recommended approach for a production system.
In addition, please note that the authorizations used in any scenario cannot exceed the authorizations of the underlying Accumulo connection.
Ingest GDELT Data with Visibilities
The rest of this tutorial will use the GDELT data set, described in the Map-Reduce Ingest of GDELT tutorial. Even if you have already ingested the GDELT data, you will need to ingest it again with visibilities.
Follow the instructions in the Map-Reduce Ingest of GDELT tutorial, with the following changes:
- When executing the map/reduce job, include the following parameter:
-visibilities <visibilities>
You can also ingest data with visibilities using geomesa command line
tools by including the –visibilities option, specifically
--visibilities user in this example.
The visibility string can be anything valid for your Accumulo instance.
For the rest of this exercise, we are going to assume the visibility
string is user, and the Accumulo table is gdelt_auths. You can
see the visibilities that are currently enabled for your user through
the Accumulo shell:
$ accumulo shell -u <username> -p <password>

Shell - Apache Accumulo Interactive Shell
-
- version: 1.5.4
- instance name: mycloud
- instance id: xxxxxxxx-xxxx-xxxx-xxxx-xxxxxxxxxxxx
-
- type 'help' for a list of available commands
-
myuser@mycloud> getauths
user,admin
If your user does not already have authorizations, you can add them
through the Accumulo shell with the addauths command:
myuser@mycloud> getauths
user
myuser@mycloud> addauths -s admin -u myuser
myuser@mycloud> getauths
user,admin
Note
A user cannot set authorizations unless the user has the System.ALTER_USER permission.
Next we’ll grant permissions to read the appropriate tables to user
and admin.
> grant -u user -p <table>.* Table.READ
> grant -u admin -p <table>.* Table.READ
Once the GDELT data is ingested, you should see a visibility label in square brackets when you scan the spatio-temporal index table through the Accumulo shell:
myuser@mycloud> scan -t gdelt_auths_records
\x0100700230-fdfe-422e-b4d1-8072db6f3dda SFT: [user]    \x02\x00\x00\x01b00700230...
Download and Build the Tutorial
Pick a reasonable directory on your machine, and run:
$ git clone https://github.com/geomesa/geomesa-tutorials.git
$ cd geomesa-tutorials
Note
You may need to download a particular release of the tutorials project to target a particular GeoMesa release. See About Tutorial Versions.
Cloning the repository should only take a few seconds. To build it, run
$ mvn clean install -pl geomesa-examples-authorizations
Note
Ensure that the version of Accumulo, Hadoop, etc in
the root pom.xml match your environment.
Note
Depending on the version, you may also need to build GeoMesa locally. Instructions can be found in Developer Manual.
Run the Tutorial
On the command-line, run:
$ java -cp ./geomesa-examples-authorizations/target/geomesa-examples-authorizations-<version>.jar \
    com.example.geomesa.authorizations.AuthorizationsTutorial \
    -instanceId <instance>                                    \
    -zookeepers <zoos>                                        \
    -user <user>                                              \
    -password <pwd>                                           \
    -visibilities <visibilities>                              \
    -tableName <table>                                        \
    -featureName <feature>
where you provide the following arguments:
<instance>the name of your Accumulo instance<zoos>comma-separated list of your Zookeeper nodes, e.g.zoo1:2181,zoo2:2181,zoo3:2181<user>the name of an Accumulo user that will execute the scans, e.g.root<pwd>the password for the previously-mentioned Accumulo user<visibilities>the visibilities used to ingest the GDELT dataset, e.g.user<table>the name of the Accumulo table that has the GeoMesa GDELT dataset, e.g.gdelt_auths<feature>the feature name used to ingest the GeoMesa GDELT dataset, e.g.gdelt
You should see two queries run and the results printed out to your console. You should see output similar to the following:
Executing query with AUTHORIZED data store: auths are 'user,admin'
Results:
1|geom=POINT (33.9744 45.2908)
...

Executing query with UNAUTHORIZED data store: auths are ''
No results
The first query should return 1 or more results. The second query should return 0 results, since they are hidden by visibilities.
Insight into How the Authorizations Tutorial Works
The code for querying with authorizations is available in the class
AuthorizationsTutorial. The interesting code for this tutorial is contained in the main
method:
// get an instance of the data store that uses the default authorizations provider, which
// will use whatever auths the connector has available
System.setProperty(AuthorizationsProvider.AUTH_PROVIDER_SYS_PROPERTY,
    DefaultAuthorizationsProvider.class.getName());
DataStore authDataStore = DataStoreFinder.getDataStore(dsConf);

// get another instance of the data store that uses our authorizations provider that
// always returns empty auths
System.setProperty(AuthorizationsProvider.AUTH_PROVIDER_SYS_PROPERTY,
    EmptyAuthorizationsProvider.class.getName());
DataStore noAuthDataStore = DataStoreFinder.getDataStore(dsConf);
This code snippet shows how you can specify the
AuthorizationProvider to use with a system property. The
DefaultAuthorizationsProvider class is provided by GeoMesa, and used
when no other implementations are found.
The com.example.geomesa.authorizations.EmptyAuthorizationsProvider
class is included in the tutorial. The EmptyAuthorizationsProvider
will always return an empty Authorizations object, which means that
any data stored with visibilities will not be returned.
There is a more useful implementation of AuthorizationsProvider that
will be explored in more detail in the next section, the
LdapAuthorizationsProvider.
Applying Authorizations and Visibilities to GeoServer Using PKIS and LDAP
This section will show you how to configure GeoServer to authenticate users with PKIs, use LDAP to store authorizations, and apply authorizations on a per-user/per-query basis.
Basic user authentication will take place via user certificates. Each user will have their own public/private key pair that uniquely identifies them.
User authorizations will come from LDAP. Once a user’s identity has been verified via PKI, we will look up the user’s details in LDAP.
Once we have a user’s authentication and authorizations, we will apply
them to the GeoMesa query using a custom AuthorizationsProvider
implementation.
Note
It is assumed for the rest of the tutorial that you have created the GeoServer data stores and layers outlined in the Map-Reduce Ingest of GDELT tutorial.
Run GeoServer in Tomcat
Note
If you are already running GeoServer in Tomcat, you can skip this step.
GeoServer ships by default with an embedded Jetty servlet. In order to use PKI login, we need to install it in Tomcat instead.
Download and install Tomcat 7.
Create an environment variable pointing to your tomcat installation (you may want to add this to your bash init scripts):
$ export CATALINA_HOME=/path/to/tomcat
If you want to reuse your existing GeoServer configuration, create an environment variable pointing to your GeoServer data directory (you may want to add this to your shell initialization scripts):
$ export GEOSERVER_DATA_DIR=/path/to/geoserver/data_dir
Copy the GeoServer webapp from the GeoServer distribution into the tomcat servlet:
$ cp -r /path/to/geoserver/webapps/geoserver/ $CATALINA_HOME/webapps/Increase the memory allocated to Tomcat, which you will need for running complex queries in GeoServer (the values here may not be applicable for every installation):
$ cd $CATALINA_HOME/bin
$ echo 'CATALINA_OPTS="-Xmx2g -XX:MaxPermSize=128m"' >> setenv.sh
Start Tomcat, either as a service or through the startup scripts, and ensure that GeoServer is available at http://localhost:8080/geoserver/web/.
Create the Accumulo Data Store and Layer in GeoServer
If you haven’t already, create an AccumuloDataStore and associated Layer pointing to the data with visibilities, as described in Map-Reduce Ingest of GDELT.
When configuring the DataStore, leave the auths field empty and set the visibilities field to what you used when ingesting data above.
Configure GeoServer for PKI Login
Follow the instructions located here in order to enable PKI login to GeoServer.
In the step where you add the ‘cert’ filter to the ‘Filter Chains’, also add it to the ‘rest’, ‘gwc’ and ‘default’ chains (in addition to web).
We will be using the ‘rod’ and ‘scott’ users, so be sure to install those into your browser.
Warning
Make sure that you click the ‘Save’ button on all GeoServer screens. Otherwise, your changes may be lost.
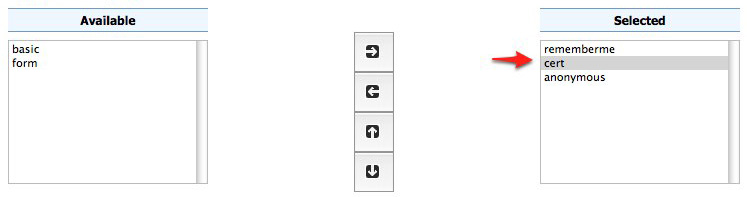
Verify that the changes were applied by re-starting Tomcat, and checking that the ‘web’ filter chain has the ‘cert’ filter selected:
Web Filter Panel
Install an LDAP Server for Storing Authorizations
Note
If you are already have an LDAP server set up, you can skip this step.
- Download and install ApacheDS
- Either run as a service, or run through the start scripts:
$ cd apacheds-2.0.0-M20/bin
$ chmod 755 *.sh
$ ./apacheds.sh
Configure LDAP for Storing Authorizations
We want to configure LDAP with a user to match the Spring Security PKIs we are testing with. The end result we want is to create the following user:
DN: cn=rod,ou=Spring Security,o=Spring Framework
In order to do that, we will use Apache Directory Studio.
- Download and run Apache Directory Studio.
- Connect to the your LDAP instance (ApacheDS), using the instructions here (note: you do not need to change the password unless you want to).
- Create a partition for our data:
- Right-click the ‘ApacheDS (localhost)’ entry under the ‘Connection’ tab and select ‘Open Configuration’.
- Click ‘Advanced Partitions Configuration…’.
- Click ‘Add’.
- Set the ID field to be ‘Spring Framework’.
- Set the Suffix field to be ‘o=Spring Framework’.
- Uncheck ‘Auto-generate context entry from suffix DN’.
- Set the following attributes in Context Entry:
- objectclass: extensibleObject
- objectclass: top
- objectclass: domain
- dc: Spring Framework2
- o: Spring Framework2
- Hit Ctrl-s to save the partition.
- Restart ApacheDS. Otherwise the partition will not be available and the LDIF import will fail.
- Load the following LDIF file, which will create the Spring Security
OU and the ‘rod’ user:
spring-security-rod.ldif- Right-click the ‘Root DSE’ node in the LDAP browser, and select ‘Import->LDIF import…’
Test LDAP Connection Using Tutorial Code
The tutorial code includes an AuthorizationsProvider implementation
that will connect to LDAP to retrieve authorizations, in the class
com.example.geomesa.authorizations.LdapAuthorizationsProvider.
The provider will configure itself based on the
geomesa-ldap.properties file on the classpath (under
src/main/resources):
# ldap connection properties
java.naming.factory.initial=com.sun.jndi.ldap.LdapCtxFactory
java.naming.provider.url=ldap://localhost:10389
java.naming.security.authentication=simple
java.naming.security.principal=uid=admin,ou=system
java.naming.security.credentials=secret

# the ldap node to start the query from
geomesa.ldap.search.root=o=Spring Framework
# the query that will be applied to find the user's record
# the '{}' will be replaced with the common name from the certificate the user has logged in with
geomesa.ldap.search.filter=(&(objectClass=person)(cn={}))
# the ldap attribute that holds the comma-delimited authorizations for the user
geomesa.ldap.auths.attribute=employeeType
The default file included with the tutorial will connect to the LDAP instance we set up in the previous steps. If you are using a different LDAP configuration, you will need to modify the file appropriately.
The LdapAuthorizationsProvider will look for a particular LDAP
attribute that stores the user’s authorizations in a comma-delimited
list. For simplicity, in this tutorial we have re-purposed an existing
attribute, employeeType. The attribute to use can be modified
through the property file.
When we inserted the ‘rod’ record into LDAP, we set his employeeType
to ‘user,admin’, corresponding to our Accumulo authorizations. If you
are using different authorizations, you will need to update the
attribute to match.
The tutorial code includes a test case for connecting to LDAP, in the
class
`com.example.geomesa.authorizations.LdapAuthorizationsProviderTest <https://github.com/geomesa/geomesa-tutorials/blob/master/geomesa-examples-authorizations/src/main/java/com/example/geomesa/authorizations/LdapAuthorizationsProviderTest.java>`__.
Once you have modified geomesa-ldap.properties to connect to your
LDAP, you can test the connection by running this test class:
$ java -cp ./geomesa-examples-authorizations/target/geomesa-examples-authorizations-<version>.jar \
   com.example.geomesa.authorizations.LdapAuthorizationsProviderTest rod
The argument to the program (‘rod’) is the user to retrieve authorizations for. You should get the following output:
Checking auths from LDAP for user 'rod'
Retrieved auths: user,admin
Installing the LDAP AuthorizationProvider in GeoServer
In order to use the LdapAuthorizationsProvider, we need to install
it as a service provider into GeoServer, where it will automatically be
picked up by GeoMesa.
The tutorial code includes a service provider registry in the
META-INF/services folder. By default, the provider class is
specified as the EmptyAuthorizationsProvider.
Ensure that your LDAP configuration is correct by running
LdapAuthorizationsProviderTest, as described above.Change the provider class in the single line file
src/main/resources/META-INF/services/org.locationtech.geomesa.security.AuthorizationsProviderto becom.example.geomesa.authorizations.LdapAuthorizationsProviderRebuild the tutorial JAR and install the *unshaded original* jar in GeoServer:
$ mvn clean install
$ cp ./geomesa-examples-authorizations/target/original-geomesa-examples-authorizations-<version>.jar \
   /path/to/tomcat/webapps/geoserver/WEB-INF/lib/
Note
We want to use the unshaded jar since all the required dependencies are already installed in GeoServer.
- Restart GeoServer (or start it if it is not running).
At this point you should have everything configured and in-place.
Verifying the LDAP Authorizations in GeoServer
In order to verify that the authorizations are working correctly, execute a query against GeoMesa by calling the WMS provider over HTTPS in your browser:
https://localhost:8443/geoserver/wms?service=WMS&version=1.1.0&request=GetMap&layers=geomesa:gdelt_auths&styles=&bbox=31.6,44,37.4,47.75&width=1200&height=600&srs=EPSG:4326&format=application/openlayers&TIME=2013-01-01T00:00:00.000Z/2014-04-30T23:00:00.000Z
When prompted, select the ‘rod’ certificate.
You should see the normal data come back, with many red points indicating the data:
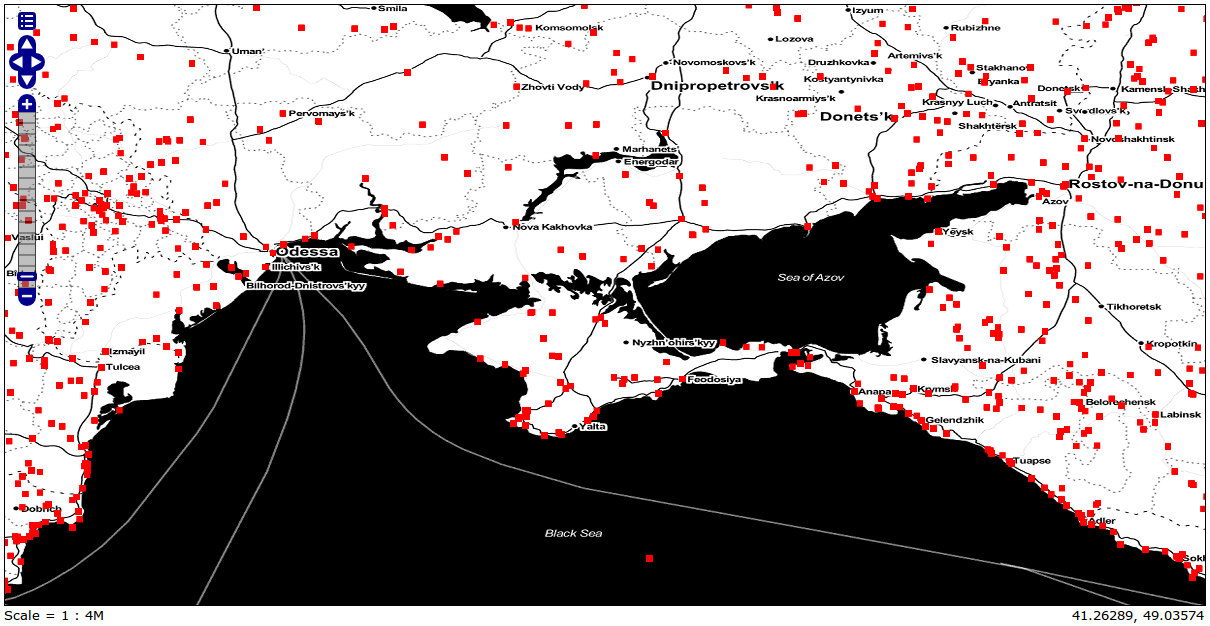
Authorized Results
Now try the same query, but use the ‘scott’ certificate. This time, there should be no data returned, as the ‘scott’ user does not have any authorizations set up in LDAP.
Note
A simple way to use different certificates at once is to open multiple ‘incognito’ or ‘private’ browser windows.
Querying GeoServer through a Web Feature Service (WFS) with a Java Client
GeoServer provides the ability to query data through a Web Feature Service (WFS). Using GeoTools, we can create a client in Java through a WFSDataStore. More details are available here and here, although some of the documentation is out of date.
We can leverage the same PKI and LDAP setup that we used through the web interface to authenticate our client.
Go back to the tutorial folder, and execute the following command:
$ java -cp geomesa-examples-authorizations/target/geomesa-examples-authorizations-<version>.jar \
    -Djavax.net.ssl.keyStore=/path/to/certs/rod.p12                    \
    -Djavax.net.ssl.keyStorePassword=password                          \
    -Djavax.net.ssl.keyStoreType=PKCS12                                \
    -Djavax.net.ssl.trustStore=/path/to/certs/server.jks               \
    -Djavax.net.ssl.trustStorePassword=password                        \
    -Djavax.net.ssl.trustStoreType=JKS                                 \
    com.example.geomesa.authorizations.GeoServerAuthorizationsTutorial \
    -geoserverUrl <url>                                                \
    -featureStore <featureStore>
where you provide the following arguments:
<url>the HTTPS path to GeoServer, e.g.https://localhost:8443/geoserver/<featureStore>the name of the data store created in GeoServer, including the workspace, e.g.geomesa:gdeltjavax.net.ssl.*SSL configuration system properties. Note that these need to be before the class name, otherwise they will be treated as arguments to the program.
Note
Ensure that the URL for GeoServer is using HTTPS.
Note
The feature store needs to be namespaced with the GeoServer workspace. The workspace and store name are separated with a colon.
Note
If you happen to have two GeoServer data stores with the same name but different workspaces, you will need to delete or rename one of them. There is a bug in GeoServer where it might return the wrong features if there are two data stores with the same name.
The system properties will control the keystore that is used for
authentication. For the first command, we are using the rod.p12
certificate. Upon execution, you should see the following output:
Executing query against 'https://localhost:8443/geoserver/wfs?request=GetCapabilities&version=1.0.0' with client keystore '/path/to/certs/rod.p12'
INFO: Cached XML schema: https://localhost:8443/geoserver/wfs?service=WFS&version=1.0.0&request=DescribeFeatureType&typeName=geomesa%3Agdelt
Results:
1|geom=POINT (33.9744 45.2908)
...
If you re-execute the command, but use the scott.p12 cert instead,
you should get no results:
Executing query against 'https://localhost:8443/geoserver/wfs?request=GetCapabilities&version=1.0.0' with client keystore '/path/to/certs/scott.p12'
INFO: Cached XML schema: https://localhost:8443/geoserver/wfs?service=WFS&version=1.0.0&request=DescribeFeatureType&typeName=geomesa%3Agdelt
No results
Insight into How the GeoServerAuthorizations Tutorial Works
The code for querying through WFS is available in the class
`com.example.geomesa.authorizations.GeoServerAuthorizationsTutorial <https://github.com/geomesa/geomesa-tutorials/blob/master/geomesa-examples-authorizations/src/main/java/com/example/geomesa/authorizations/GeoServerAuthorizationsTutorial.java>`__.
The interesting code for this tutorial is contained in the main
method:
// create the URL to GeoServer. Note that we need to point to the 'GetCapabilities' request,
// and that we are using WFS version 1.0.0
String geoserverUrl = geoserverHost + "wfs?request=GetCapabilities&version=1.0.0";

// create the geotools configuration for a WFS data store
Map<String, String> configuration = new HashMap<String, String>();
configuration.put(WFSDataStoreFactory.URL.key, geoserverUrl);
configuration.put(WFSDataStoreFactory.WFS_STRATEGY.key, "geoserver");
configuration.put(WFSDataStoreFactory.TIMEOUT.key, cmd.getOptionValue(SetupUtil.TIMEOUT, "99999"));
...

// verify we have gotten the correct datastore
WFSDataStore wfsDataStore = (WFSDataStore) DataStoreFinder.getDataStore(configuration);
This code snippet shows how you can get a GeoTools DataStore that
connects to GeoServer through WFS. Once you have obtained the data
store, you can query it just like any other data store, and the
implementation details will be transparent.