Feature Level Visibility and Security
GeoMesa supports security on a per-feature level, leveraging Accumulo’s support for built-in cell-level visibility. This allows data to be filtered on a granular level for different users. From the Accumulo user guide:
Accumulo extends the BigTable data model to implement a security mechanism known as cell-level security. Every key-value pair has its own security label, stored under the column visibility element of the key, which is used to determine whether a given user meets the security requirements to read the value. This enables data of various security levels to be stored within the same row, and users of varying degrees of access to query the same table, while preserving data confidentiality.
In this tutorial, we’ll go through ingesting data with varying levels of visibility and querying that data as different users through GeoServer.
Prerequisites
You will need:
- an Accumulo 1.7 or 1.8 instance running on Hadoop 2.2 or better,
- an Accumulo user that has appropriate permissions to manage authorizations and query data,
- Java JDK 8,
- Apache Maven 3.2.2 or better, and
- a git client
If you haven’t already read both the Installation section of the GeoMesa User Manual and the GeoMesa Accumulo Quick Start, you should do so now, and make sure you have gone through the initial setup of GeoMesa.
Additionally, you should be familiar with Accumulo’s Security Label Expression Syntax, which we make use of when securing features in GeoMesa.
Download and Build the Tutorial
Pick a reasonable directory on your machine, and run:
$ git clone https://github.com/geomesa/geomesa-tutorials.git
$ cd geomesa-tutorials
Note
You may need to download a particular release of the tutorials project to target a particular GeoMesa release. See About Tutorial Versions.
To build, run
$ mvn clean install -pl geomesa-examples-featurelevelvis
Note
Ensure that the version of Accumulo, Hadoop, etc in
the root pom.xml match your environment.
Note
Depending on the version, you may also need to build GeoMesa locally. Instructions can be found under Installation.
Run the Tutorial
On the command-line, run:
$ java -cp geomesa-examples-featurelevelvis/target/geomesa-examples-featurelevelvis-${geomesa.version}.jar \
    com.example.geomesa.accumulo.FeatureLevelVisibility \
    -instanceId <instance>                              \
    -zookeepers <zookeepers>                            \
    -user <user>                                        \
    -password <password>                                \
    -tableName <table>
where you provide the following arguments:
<instance>the name of your Accumulo instance<zookeepers>your Zookeeper nodes, separated by commas<user>the name of an Accumulo user that has permissions to create, read and write tables<password>the password for the previously-mentioned Accumulo user<table>the name of the destination table that will accept these test records; this table should either not exist or should be empty
You should see output on creating and querying the simple features.
Understanding The Code
If you inspect the code, you’ll notice only a few changes from the
original Accumulo Quick Start project. The main change is that the
SimpleFeatureType has an additional attribute, “visibility”, added
to it. This attribute will assist later in testing that features were
written with the appropriate Accumulo visibilities.
Additionally, if you look in the createNewFeatures method, you’ll
see:
if (i % 2 == 0) {
    simpleFeature.setAttribute("Visibility", "admin");
    SecurityUtils.setFeatureVisibility(simpleFeature, "admin");
} else {
    simpleFeature.setAttribute("Visibility", "user|admin");
    SecurityUtils.setFeatureVisibility(simpleFeature, "user|admin");
}
This is where visibilities are being set in Accumulo. The line
SecurityUtils.setFeatureVisibility(simpleFeature, "admin");
is adding storing the visibility in the SimpleFeature’s user data.
When writing to Accumulo, GeoMesa will use that user data to apply the
appropriate Accumulo visibility string to the record.
Because the feature has a visibility of admin, only users with the
admin authorization will be able to see the feature.
In the Quickstart example, 500 features are written with the visibility
admin and 500 are written with user|admin. However, unless users
are explicitly granted permissions to read these tables and read
features with that level of authorization, we cannot visualize the data
in a meaningful way. Next we will add new Accumulo users to do just
that.
Adding New Accumulo Users
In this part of the tutorial, we’ll get familiar with the Accumulo shell. First, login to Accumulo with:
$ accumulo shell -u <username>
Accumulo will prompt you for your password. You should then see something similar to this:
Shell - Apache Accumulo Interactive Shell
-
- version: 1.5.0
- instance name: accumulo
- instance id: {instance-id}
-
- type 'help' for a list of available commands
-
{username-here}@accumulo>
Now, we’re ready to add new users to Accumulo with the Accumulo shell
createuser command. At the prompt, run:
> createuser user
Enter new password for 'user': ***********
Please confirm new password for 'user': ***********
> createuser admin
Enter new password for 'admin': ***********
Please confirm new password for 'admin': ***********
With these new users added, we’re going to give them the proper
authorizations with the setauths command:
> setauths -s admin,user -u admin
> setauths -s user -u user
This will grant authorizations admin,user to admin, meaning as
the user admin, one will be able to read both features written with
the visibility user and features written with the visibility
admin. Additionally, the user user will be granted user
authorizations, meaning they can only view features of visibility
user. They will never see features written with the visibility
admin.
Next we’ll grant permissions to the read the appropriate tables to
user and admin.
> grant -u user -p <table>.* Table.READ
> grant -u admin -p <table>.* Table.READ
To verify user permissions you can switch users in the accumulo console by using:
> user admin
Enter password for user admin: ******
We can now move to the table we’d like to verify. Here we use
<table>_z2_v2 but any valid table will work.
> table <table>_z2_v2
> scan
\x01\x00\x0C0\xB0Pf\x0A&\x19Observation.99 F: [user|admin]    \x02\x00\x00\x00CAddam\xF3\x01\x00\x00\x00\x00\x00\x00\x00c\x01\x00\x00\x01H\xAC\xB4;\xB0\x01\x08\x03\xC0Sz\x1Ff\x15}H\xC0C(\xC5jq\x08\x8F\x7F\xF8\x00\x00\x00\x00\x00\x00\x80user|admi\xEE\x05\x0B\x14\x1D89
\x01\x00\x0C0\xB22\xB7-\xA4;Observation.585 F: [user|admin]    \x02\x00\x00\x00CAddam\xF3\x01\x00\x00\x00\x00\x00\x00\x02I\x01\x00\x00\x01DUby\xE8\x01\x08\x03\xC0S\x7F\xDF\x0Aw\xD9\x14\xC0C\x19\xA4\xFC{\xE7\xA6\x7F\xF8\x00\x00\x00\x00\x00\x00\x80user|admi\xEE\x05\x0B\x14\x1D89
---------------hit any key to continue or 'q' to quit ------------------
scan should return a sample of the data if everything is configured
correctly.
Let’s move on to GeoServer to visualize feature level visibility.
GeoServer Visualization
Assuming you have already set up GeoServer as described in the GeoMesa
User Manual, we’re going to add a new DataStore to GeoServer. First,
login to GeoServer, and then click “Add stores” from the homepage.
Next, click the link to add a new “Accumulo (GeoMesa)” store and name it
feature-level-visibility-admin. Fill in the correct connection
parameters to make contact with GeoMesa/Accumulo, but be sure to use
admin for the “user” parameter.
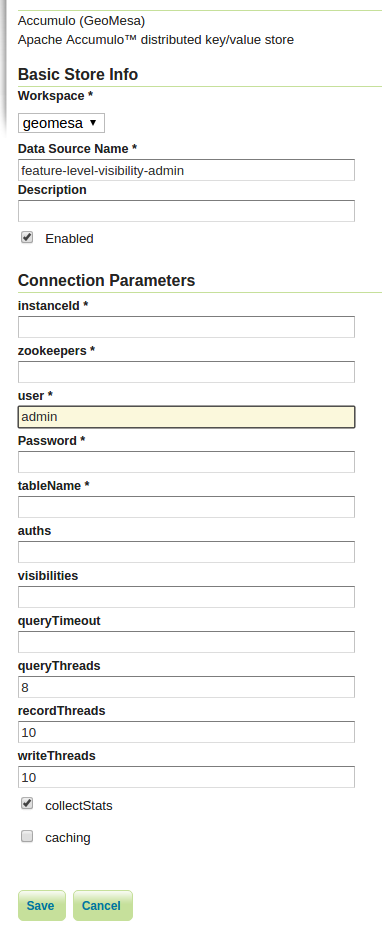
GeoMesa DataStore configuration with “admin” user
Then, publish your layer when prompted by GeoServer. Remember to click the “Compute from data” and “Compute from native bounds” links on the “Add Layer” page, and click “Save”.
Repeat the above steps one more time to add an additional DataStore
with the same parameters, but this time, name it
feature-level-visibility-user and use user for the “user”
parameter.
With your layers added in GeoServer, we’re nearly ready to visualize the data. One final step is adding our custom SLD that will style your features to make visualizations of the data even easier to understand.
Download feature-level-vis.sld,
or copy the contents, and add it as a Style in GeoServer. It will style the points on
a map based on the visibility attribute present.
Lastly, click on “Layer Preview” in the left hand sidebar and find your
two newly added layers. If everything went correctly, you should see
fewer results returning in the user layer than in the admin
layer, and this is expected behavior. Because user has only been
granted permission to view features with the user visibility, only
those 500 records are returned. However, the admin user is granted
permission to see both admin and user visibilities.
Expanding The Concept
In this very simple example, you wrote features of two different visibilities, added two new users to Accumulo, and granted them separate authorization levels to be able to view portions of the data. This tutorial has real-world use cases in security and data integrity. For example, when storing sensitive data and having users of varying authorization and security levels querying that data, visibility labels ensure that sensitive data is not leaked to a user of a lower level of security.
The concept of feature level visibility can be extended and modified to have many more, or only a few, visibility levels. And with GeoServer being flexible and extensible, writing a module to consider feature level security in GeoServer is relatively painless.
GeoMesa also provides a mechanism to have authorizations applied on a per-user level, instead of a per-datastore level. More information, including integration with PKI and LDAP, can be found in the Authorizations tutorial under Applying Authorizations and Visibilities to GeoServer Using PKIS and LDAP.
Conclusion
In this tutorial, you learned about feature level visibility and
security built into GeoMesa. You ingested a dataset of 1000 features to
your GeoMesa instance – 500 having the visibility admin and 500
having the visibility user|admin. You added two new users to
Accumulo and granted them the correct authorization levels to query the
data. Finally, you visualized the data and saw how, despite both
DataStore connecting to the same features in GeoMesa, user could
only have a subset of those features returned because of the lower
security authorization.