14. GeoServer Plugins
A straightforward way to render, manipulate, and manage data stored in GeoMesa data stores is to use GeoServer, an open source server for sharing geospatial data. This chapter describes how to work with the GeoMesa GeoServer plugins.
14.1. Installation
Instructions for installing the GeoMesa plugins in GeoServer are available by datastore:
Go to your GeoServer installation at http://<hostname>:8080/geoserver.
For new installations of GeoServer, the default username is admin and
password is geoserver, but these may be different at your own installation.
14.3. Publish a GeoMesa Layer
After a GeoMesa data store is successfully created, GeoServer will present a list of feature types registered in that data store. Click “Publish” next to the name of a feature type to create a layer of the data in GeoMesa of that type.
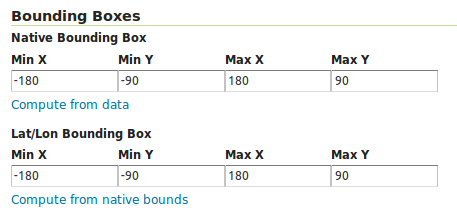
You will be taken to the Edit Layer screen. To render your layer, you must first set values for the bounding boxes in the “Data” pane. In many cases, you can click on the “Compute from native bounds” link to compute these values from the data.
Click on the “Save” button when you are done.
Warning
When configuring a time-enabled layer, generally you should set the presentation to “Continuous interval.”
Setting presentation to “List” will require displaying all unique time values in the layer, and cause WMS
GetCapabilities requests to be slow.
14.4. Preview a Layer
Click on the “Layer Preview” link in the left-hand menu. Once you see your layer, click on the “OpenLayers” link, which will open a new tab. If you have ingested data into GeoMesa, it will be displayed here.
If the data you have ingested is a set of latitude/longitude points, click on one of the points in the display (rendered by default as red squares), and GeoServer will report detailed records stored in the GeoMesa store in the region underneath the map area.
Click on the “Toggle options toolbar” icon in the upper-left corner of the preview window. The right-hand side of the screen will include a “Filter” text box. Enter a search query on the attributes of the feature type of the data you have ingested, and press on the “play” icon. The display will now show only those points matching your filter criterion.
This is a CQL filter, which can be constructed in various ways to query data. You can find more information about CQL from GeoServer’s CQL tutorial.
Note
If you enabled the time dimension for a layer, such as instructed in the GeoMesa Accumulo Quick Start,
then you will need to specify a TIME parameter in the URL of the form:
&TIME=2014-01-01T00:00:00.000Z/2014-01-31T23:59:59.999Z
That tells GeoServer to display the records for the entire month of January 2014. GeoServer will add an implicit
time filter if you do not specify one, which may cause unexpected results. This TIME parameter is distinct from the
CQL_FILTER parameter and specifying a CQL time filter without the TIME parameter may create an empty intersection
with the implicit time filter. You can find more information about the TIME parameter from GeoServer’s documentation.
14.5. Analysis with WPS
As described by the Open Geospatial Consortium’s Web Map Service page,
The OpenGIS® Web Map Service Interface Standard (WMS) provides a simple HTTP interface for requesting geo-registered map images from one or more distributed geospatial databases. A WMS request defines the geographic layer(s) and area of interest to be processed. The response to the request is one or more geo-registered map images (returned as JPEG, PNG, etc) that can be displayed in a browser application. The interface also supports the ability to specify whether the returned images should be transparent so that layers from multiple servers can be combined or not.
A tool like GeoServer (once its WPS plugin has been installed) uses WPS to retrieve data from GeoMesa. WPS processes can be chained, letting you use additional WPS requests to build on the results of earlier ones.
14.6. Configuration
14.6.1. WMS Plugin
Depending on your hardware, it may be important to set the limits for your WMS plugin to be higher or disable them completely by clicking “WMS” under “Services” on the left side of the admin page of GeoServer. Check with your server administrator to determine the correct settings. For massive queries, the standard 60 second timeout may be too short.
14.6.2. Logging Explain Query Planning
The GeoMesa Accumulo data store can explain its plan for executing queries,
as described in Explaining Query Plans. To enable the logging of explain query
planning in GeoServer, add the following to the
$GEOSERVER_DATA_DIR/logs/DEFAULT_LOGGING.properties file:
log4j.category.org.locationtech.geomesa.index.utils.Explainer=TRACE
If you are not sure of the location of your GeoServer data directory, it is printed out when you start GeoServer:
----------------------------------
- GEOSERVER_DATA_DIR: /path/to/geoserver-data-dir
----------------------------------
14.6.3. Monitoring GeoMesa DataStores
GeoMesa DataStores can log query metrics as JSON via log4j. To use this, there are two steps:
First, GeoServer logging needs to log TRACE level messages in the org.locationtech.geomesa.utils.monitoring package.
To enable that logging, edit the GeoServer logging
file (e.g. $GEOSERVER_DATA_DIR/logs/DEFAULT_LOGGING.properties) and add entries like:
log4j.appender.metrics=org.apache.log4j.FileAppender
log4j.appender.metrics.File=metrics.log
log4j.appender.metrics.layout=org.apache.log4j.PatternLayout
log4j.appender.metrics.layout.ConversionPattern=%m%n

log4j.category.org.locationtech.geomesa.utils.monitoring=TRACE, metrics
Second as a DataStore is registered in GeoServer, the collectQueryStats box should be ticked for the store.
14.7. GeoMesa GeoServer Community Module
The GeoMesa community module adds support for raster imagery to GeoServer. The community module requires the Accumulo GeoServer plugin to be installed first.
The community module can be downloaded from OpenGeo, or can be built from source.
Once obtained, the community module can be installed by copying geomesa-gs-<version>.jar into
the GeoServer lib directory.